Continuous Integration with Hudson/Jenkins
Introduction to Continuous Integration
Continuous Integration is the given name for the good practices used in software engineering. These good practices aim at checking that a source code modification does not lead to a regression on the developping software application. This checking is usually performed on a different machine than your development one (this machine is called an integration server); and this checking is carried out rather frequently [1], and so it’s called Continuous Integration.
The tool responsible for this checking is a Continuous Integration tool such as CruiseControl or Hudson/Jenkins. This checking is called a Build. A build will correspond, according to your project, in a succession of steps, such as:
- Compilation,
- Documentation generation (javadoc for instance),
- Unit tests execution,
- Quality analysis on source code (coding conventions, number of comments, code metrics, etc.),
- Delivery generation (exe, zip, tar, etc.).
The continuous integration tool does not perform the build itself, but just launch it with regular interval, display the result of the build, and is able of sending notification to project members if a modification involved any regression.
This development method, initiated at the beginning by the Extreme Programming community and adopted by Agiles methods, brings adding value to your development process. For instance:
- Tests are immediatly executed after each modification (step sometimes neglected by developers),
- Integration issues are continuously detected, to be fixed as soon as possible,
- It always exists an operational version of deliveries available for tests, demo or distribution.
The continuous integration tool we decided to integrate in Tuleap is Hudson/Jenkins, which is one of the best tool. Jenkins is a fork of Hudson. So in this chapter we will use the name Hudson. It stands both for Hudson and Jenkins. Hudson configuration can be easily done on the web interface, and there is a contextual help for each step of the configuration, which is really appreciable.
The lexicon of Continuous integration and Hudson is quite specific. Let’s then give a definition:
| Word | Definition |
|---|---|
| Job | The concept of Job can be associated with the concept of project. The job will trigger the build, but it’s also in charge of setting the building environment required for executing the build (updating the source code for instance). It will also be able to execute the build, and then perform some tasks such as publishing generated documentation, publishing test results, sending notifications, etc.) |
| Build | Process is made of several steps executed periodically on a continuous integration server. |
| Artifact | Item are generated during the build, and are published by the continuous integration tool. The continuous integration notion of artifact is obviously different than the notion of a Tuleap artifact (which is an item tracked in a tracker). |
| Workspace | Directory where the project will be deployed in order to perform the build, and enventually publish artifacts. |
| Status (of the build) | Build status can take several values regarding the tool. Hudson has 4 status:
|
| Trend (of the builds) | Trend based on the latest 5 builds. This trend is represented by a weather report (sun, thunder, etc.) meaning that the trend is good or not. |
Glossary of Hudson and continuous integration specific words
Hudson Configuration
Before creating your own jobs, (see Hudson Jobs Creation and Configuration), you need to configure Hudson. All these steps are optional, you only have to configure what you really need.
System Configuration
To configure Hudson, select the link “Manage Hudson” in the top menu in Hudson interface, and then the link “Configure System”.
All these steps have an online contextual help. Don’t be afraid to use it. To do it, you only have to select the question mark corresponding to the option needed.
External Tools
In order to be able to execute builds of your projects, Hudson needs to know the path to the tools required to.
You can specify here the path to the external tools you need. By default, the available tools are JDK, Shell, Ant, Maven and CVS. If you install some plug-ins (see Hudson Plug-ins) that need external tools, you will be able to configure them in this section. You can define several instances of the same tool (several version of JDK for instance).
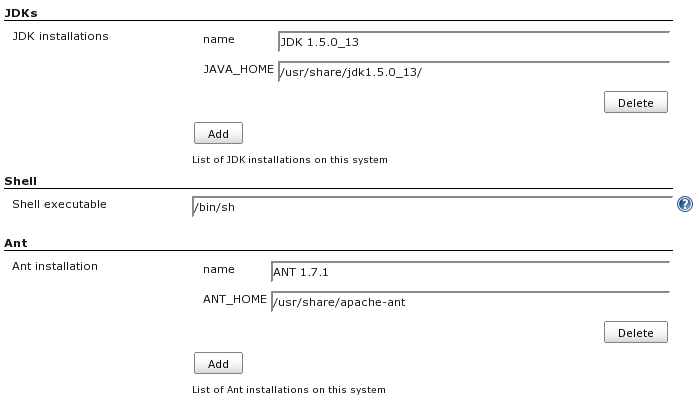
External Tools Configuration
Authentication
By default, everyone can browse Hudson, browse the jobs, see the builds results and schedule builds on the web interface.
You can nevertheless restrict the permissions. To do that, yo need to check the box “Enable security” (still in the menu “Manage Hudson” -> “Configure System”). You have several options:
- Delegate to servlet container: in our case, it means Tomcat. The Tomcat configuration file for user definition and permissions is <tomcat>/conf/tomcat-users.xml. See container documentation for more details.
- LDAP: if you already have a LDAP directory, you only need to specify the address of the server, and Hudson will recognize the users.
- Hudson’s own user database: Hudson can manage its own user database. In this case, you have to create yourself the users, or allow them to register.
The choice of enabling security or not will depend on your company internal rules, or the specificity of your projects or the size of the teams.
Email Notification
Hudson is able to send notification to warn about build result. You can of course configure this for each job. To enable notification, you need to state a mail server (SMTP server). Leave the field empty if you want to use the default mail server (localhost).
You can also define a default user email suffix. By default, all of the Tuleap users have an email address of the form login@tuleap.example.com that is mapped to the real email address. You can then fill this field with the value @tuleap.example.com and the emails will be automatically sent to the right users.
You can also specify the system Admin Email Address. Notification e-mails from Hudson to project owners will be sent with this address in the from header.
You finally need to state the URL of the Hudson server. URL in sent emails will then be correct.
Hudson Plug-ins
Lots of plug-ins are available to extend Hudson. Among them, we can quote: checkstyle, CI game, Crap4J, LDAP Email, MSBuild, NAnt, NUnit, Selenium, etc.
The list of available plug-ins is also available in the menu “Manage Hudson” -> “Manage plugins”. The list is dynamicaly updated. If your continuous integration server is behind a proxy, you will need to configure it in the “Advanced” tab.
To install a plug-in, check the box in front of the wished plug-in, press the Install button and then follow the instructions.
Hudson Jobs Creation and Configuration
Once the system is configured, you can start defining your jobs. To do that, select the link “New job” in the menu on top left. You just have to give a name (the name of your project for instance) and choose the type. Several types of jobs are possible. The most common is “free style software project” that we are using as an example in this documentation. There is also a type “Maven2” if you already use this build tool.
Select the Ok button to confirm the job creation. The next screen is then the job configuration screen. You can add a description if you want. Then, you will be able to specify the source code repository, and the way that Hudson will handle the source code updates, define the steps of the build, and tell Hudson what to do after the build.
CVS and Subversion
By default, Hudson suggests the same two SCM (Source Code Management) as Tuleap: CVS and Subversion. Select the manager you’re using for your project, and then enter the information about the paths to your project’s repository.
CVS
To configure CVS, you need to give the CVSROOT of your project. The expecting format is :protocol:user@host:path
You can find the details of the expecting string selecting the CVS tab of your project in Tuleap. It looks like :pserver:[username]@[projectname].tuleap.example.com:/cvsroot/[projectname]
You can also provide one or several modules and/or a branch.
Subversion
To configure Subversion, you need to provide the URL of the repository. This piece of information is available on the Tuleap interface, by selecting the SVN tab of your project. It looks like https://tuleap.example.com/svnroot/[projectname]
Hudson will then ask you to give credentials for Subversion, to be able to access the repository. You can then choose several options for managing this authentication (either give your login/password or use SSH public key authentication or HTTPS client certificate). We let you choosing what option better fits your needs.
You can add several repositories by pressing the button “Add more locations…”.
Finally, if you want to give the ability to the users to navigate in the source code repository through Hudson interface, you can select “ViewSVN” in the field “Repository browser”, and then enter the folowing string: https://tuleap.example.com/svn/viewvc.php?roottype=svn&root=[your_projet_short_name]
Builds Schedule
As explained in introduction, the big thing with continuous integration is the fact that once configured, the build is continuously done, and you don’t have to think about it. However, we still need to configure the way hudson will schedule the build. Two main options are available:
- Poll SCM: will poll changes in your project SCM (CVS or Subversion). You can define the frequency following the cron syntax (see Hudson inline help). This option can however be expensive operations for the Tuleap server. You can think of using the ‘push’ option to avoid this problem (see below).
- Trigger builds remotely: this ‘push’ option avoids server overloading. The build is triggered by an URL. To avoid anybody to trigger builds, you can protect the operation by specifying an authentication token. To really enable the build trigger after each commit, you will need to configure it in Tuleap, in the ‘Build’ tab of your project (See Link Hudson job with your Tuleap project). You will be able to specify your token if you have defined one.
Build configuration (steps)
You now need to define what the build will effectively do (compile your project, generate documentation, launch unit tests, etc.). To do that, you can add as many steps as needed. By default (meaning without any other plug-ins), Hudson offers 4 types of possible steps:
- Execute shell: let you simply enter a shell script in the text area. You can use several environment variables (see inline help).
- Execute Windows batch command: let you simply enter a Windows batch script in the text area. You can use several environment variables (see inline help).
- Invoke Ant: let you invoke an Ant script. If several Ant version are available (see External Tools), you can choose the one you want. You can also precise the Ant target if needed. Pressing the “Advanced” button, you will be able to specify properties and Java options.
- Invoke top-level Maven targets: let you invoke Maven targets. You can specify the expected targets. The “Advanced” button lets you define POM file, properties and Java options.
The step configuration is specific to your project. We will let you configure it as needed.
Post-build Actions
After a build, Hudson can do some actions. Among them:
Archive the artefacts: if your build produces deliveries (such as exe, zip, or tar), or generate user documentation for instance, you can publish these artifacts on the Hudson build page of your job. You need then to specify the path to the artifacts to publish (the reference directory is the workspace of your project). You can use the wildcard (*) to state artifacts to publish. You can also decide to keep the history of artifacts, or just the latest successfully generated ones to save space.
Publish Javadoc: if your build produces javadoc, you can publish it on the build page by giving the path to the root folder of the generated javadoc. The reference folder is the workspace. You can also use the wildcard, and can choose either archive old versions of the javadoc or not.
Publish JUnit test result report: if your build executes JUnit tests, you can publish a result report on the build page in specifying the path of the JUnit generated XML report files. If you use another test plug-in, you will find nearly the same.
Build other projects: Your job can depend on another one. In this case, you maybe want to build another project after the current build. If so, just indicate the name of the job to build after this build. You can specify if the job has to be built even if the current build failed or not.
Email notification: Hudson is able to send emails while some events happen. You can enter a list of email addresses to be notified. A good practice could be giving a mailing list address (specific for Hudson or not) in order to notify all the team (see Creation to know how to create mailing lists). Events that trigger notification are managed as followed:
- Every failed build triggers a new e-mail.
- A successful build after a failed (or unstable) build triggers a new e-mail, indicating that a crisis is over.
- An unstable build after a successful build triggers a new e-mail, indicating that there’s a regression.
- Unless configured, every unstable build triggers a new e-mail, indicating that regression is still there.
For lazy projects where unstable builds are the norm, Uncheck “Send e-mail for every unstable build”.
You can also send a separate email to people who broke the build. To do this, the continuous integration server must be well configured (see Email Notification).
Integration in Tuleap
As continuous integration is a good practice in software engineering, Tuleap integrates Hudson tool. We know how to install (see the official installation guide) and configure (see Hudson Configuration) Hudson, and how to create and configure Hudson jobs (see Hudson Jobs Creation and Configuration). Let’s see now how Hudson is integrated to Tuleap.
Hudson Service
If Hudson plugin is installed and enabled on your Tuleap server, each project can enable the Hudson service (see Service Configuration to know how to enable services for your project).
Once the service is enabled, you will see a “Build” tab in the service bar of your project : the Hudson continuous integration tab.
Link Hudson job with your Tuleap project
In order to link Hudson job with your project, select the Build tab of
your project, and then select the ‘Add a job’ link. You need then to
give the URL of the Hudson job you want to associate with your project
(for instance: https://[my\_ci\_server]:8080/hudson/job/[my\_job]).

Link Hudon job with your project
You may also want to enable the auto trigger of the build for this job after each commit in your project repository (CVS or Subversion). If you have protected your build with a token, you can specify this token (see Builds Schedule for more information). By checking this option, each commit will trigger a build of the associated job, using the pre-commit hook (you don’t have anything more to do).
By the way, it is possible to link several Hudson jobs with one Tuleap project.
Browse Hudson jobs and builds
When you select the Build tab of your project, you can see a table with all the jobs associated with your project. For every job, you can see the current status (colored bullet left to the name of the job), the name, the last successfull build, the last failed build, if you have enabled SCM trigger or not (see ?). Project admins will also see for each job some icons that let them modify the job or delete it (remove the link with Tuleap).
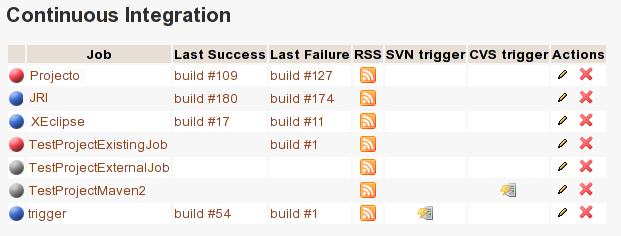
Hudson jobs associated with your project
The name of the job is automatically detected during job creation. But you can change it if needed. This is pretty convenient if you want to make references to Hudson items (see Make a reference to a Job). Spaces in the name of jobs are not allowed. They are replaced by (_), in order to allow references.
The name of the job and the latest builds are hypertext links that will be opened the corresponding Hudson section in a frame below the table. This is really convenient to browse Hudson interface while staying in the Tuleap interface. If you want to open the Hudson frame in a specific window, just select the ‘show only this frame’ link.
The table provides also links to Hudson jobs RSS feed.
Hudson Widgets
Hudson service lets you adorn your personal and project dashboards with many widgets. To know how to add widgets to your personal dashboard, see Login and Personal Page. The procedure is similar to add widgets to project dashboards (see Project Dashboard Content).
- My Hudson jobs: only available on the personal dashboards. By default, it gives an overview of all the jobs of all the projects you are member of. You can of course select the jobs you wish to display by selecting the preferences link of the widget.

“My Hudson Jobs” Widget
- Jobs Overview: this widget is only available on project dashboards. It can display an overview of all the jobs associated with this project. You can always choose the ones you want to display in the widget (preferences link).

“Jobs Overview” Widget
- Last Builds: this widget is available for both personal and project dashboards. It is linked to only one job, and show the last builds for this job (last one, last successfull, last failed). It also displays the project weather report (project trend, see Introduction to Continuous Integration).

“Lasts Builds” Widget
- Test Results: this widget is available for both personal and project dashboards. It is linked to only one job, and show the test results of the latest build for the selected job. To display something, your job needs to execute tests and publish them. The result is shown on a pie chart.
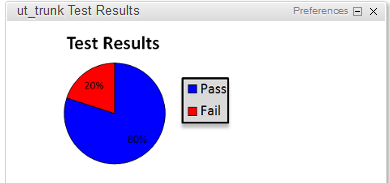
“Test results” Widget
- Test Trend: this widget is available for both personal and project dashboards. It is linked to only one job, and show the test result trend for the job. Of course, your job needs to have tests to display something. The graph will show the number of tests (failed and successfull) along time. It can be very convenient for project managers to check that the number of tests is increasing while the number of build and commits are increasing too.
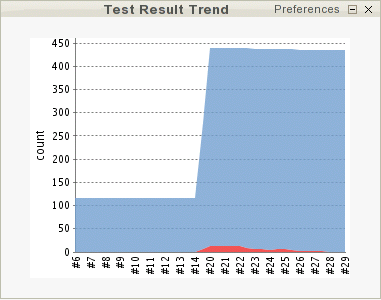
“Tests Trend” Widget
- Build History: this widget is available for both personal and project dashboards. It is linked to only one job, and show the build history, under the form of RSS feed. For each build of the list, you can see the build number, the status and the date the build has been scheduled.
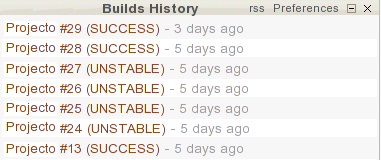
“Builds History” Widget
- Last Artifacts of the Build: this widget is available for both personal and project dashboards. It is linked to only one job, and show the last artifacts published. To display something, your job needs to publish artifacts.

“Last artifacts of the Build” Widget
Hudson References
It is possible to make references to Hudson items in Tuleap. There are some predefined references (job, build), but you can also create your own references if needed (see Reference Overview for more details about references)
Make a reference to a Job
The keyword to make a reference to a Job is: job. To make a reference to a job, you can use the expressions:
- job #JobNameToReference (the job must be in the current project)
- job #project:JobNameToReference (will make a reference to the job ‘JobNameToReference’ of the project ‘project’)
- job #project_num:JobNameToReference (will make a reference to the job ‘JobNameToReference’ of the project with number ‘project_num’)
Make a reference to a build
The keyword to make a reference to a build is: build. To make a reference to a build, you can use the expressions:
- build #XXX (there must be only one job associated with the current project, and the referenced build will be the build number ‘XXX’ of this job)
- build #AJob/XXX (will make a reference to build number ‘XXX’ of job named ‘AJob’ of the current project)
- build #project:AJob/XXX (will make a reference to the build number ‘XXX’ of the job ‘AJob’ of project ‘project’)
- build #projet_num:AJob/XXX (will make a reference to the build number ‘XXX’ of the job ‘AJob’ of the project number ‘project_num’)
| [1] | Several strategies are possible: after each commit, with regular interval (every hours, every night). It depends on the size of the project, the number of developers, the frequency of modifications. |