Delivery Manager
Guidelines
There are 2 ways by which project administrators can provide access to their project source code on Tuleap: the software configuration management repository (Subversion or Git) and the Delivery Manager. At first glance, having two distinct Tuleap services seems redundant. However both have been developed with different objectives and target audience in mind and they are very much complementary. Providing both is definitely a plus for your visitors.
- The SCM repository provides a full access to your source code including its entire version history. However accessing the source code via SCM tools requires that the Tuleap user installs specific software on his machine. Not everybody is capable or willing to do so. SCM access is well suited for Tuleap users who want to get deeper in the project code, add some new extensions, fix bugs and contribute changes back to the project team. Please be aware that certain projects decide to restrict the access to the SCM to project members only. Hence the importance of the file release mechanism.
- The Delivery Manager allows you to publish pre-packaged version of the source code and/or binaries in one or several archive file (zip, tar, jar,…) that an authorized user can easily download from the Tuleap Web site. No specific tools or knowledge is required. Besides possibly providing pre-packaged source code it is also considered a very good practice to provide ready-to-use binary version of your software to make developers life even easier. The File Release service is well suited for people who want to start using your software without any further delay.
As you can see both services are fundamentally different in nature and we strongly encourage project teams to use both of them. In order to help project teams understand why these two services are highly complementary a typical project life cycle is documented on A Typical Software Development Life Cycle on Tuleap.
Delivery Manager Jargon
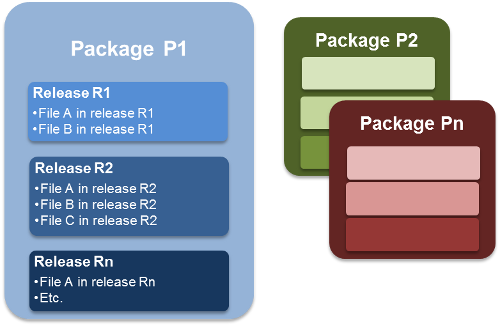
Before we get further into the description of the Delivery Manager let’s review the terms used throughout this section. These terms are key for the understanding of the tool mechanism both for users and administrators (see Delivery Manager Structure).

Delivery Manager Structure
- Packages : these are the topmost entities visible in the Delivery Manager. A package is a container for one or several releases. In general a package do correspond with high-level deliverables of your software products. Let’s assume that your team is working on a database engine. Possible packages could be DB-engine for the database engine itself and DB-drivers for the database drivers like ODBC or JDBC drivers. A third package DB-Docs could also be created to deliver the documentation in a separate container.
- Releases: a release is a collection of individual files that were all frozen and time stamped at a given moment in time. In that sense it is also a container like a package but one level below. The files contained in a release generally correspond to a given version (also called release) of your software. Building on the database example above we could imagine than the DB-engine package has release 1.0, release 1.1 and release 2.0beta available. DB-drivers could have release 1.0 as well but no release 1.2 because the 1.0 drivers also work with the release 1.2 of DB-engine. In other words release naming can be completely independent from one package to another.
- Files: files are the basic entities that one can find in a release. Again building on the database engine example, we can imagine that the release 1.0 of package DB-engine contains the file db-engine-src-1.0.zip for the source file and db-engine-win32-1.0.zip for the pre-compiled Windows version. When release 1.2 of the DB-engine package pops up, we could have files db-engine-src- 1.2.zip for the source file and db-engine-win32-1.2.zip for the pre-compiled Windows version and a new file called db-engine-linux-intel-1.2.zip for the pre-compiled Linux version running on Intel hardware. We haven’t said a word about the DB-docs package. May be it is still empty for the moment ;-)
Note
This is really the kind of structure a project team should aim at to make their deliverables easy to understand and easy to access for the community. Thinking about the structure of your software and documentation deliverables ahead of time can help you structure your team, your working processes (e.g. build and test process) in the right way. Do not overlook this part of your project.
File Release Browsing and Download
The latest version of each project package (if any) might be visible on the Project Dashboard (see Project Dashboard Content). The latest version can immediately be downloaded by clicking on the “Download” link or visit the complete list of packages and release by clicking on the “[View ALL project files]” link.

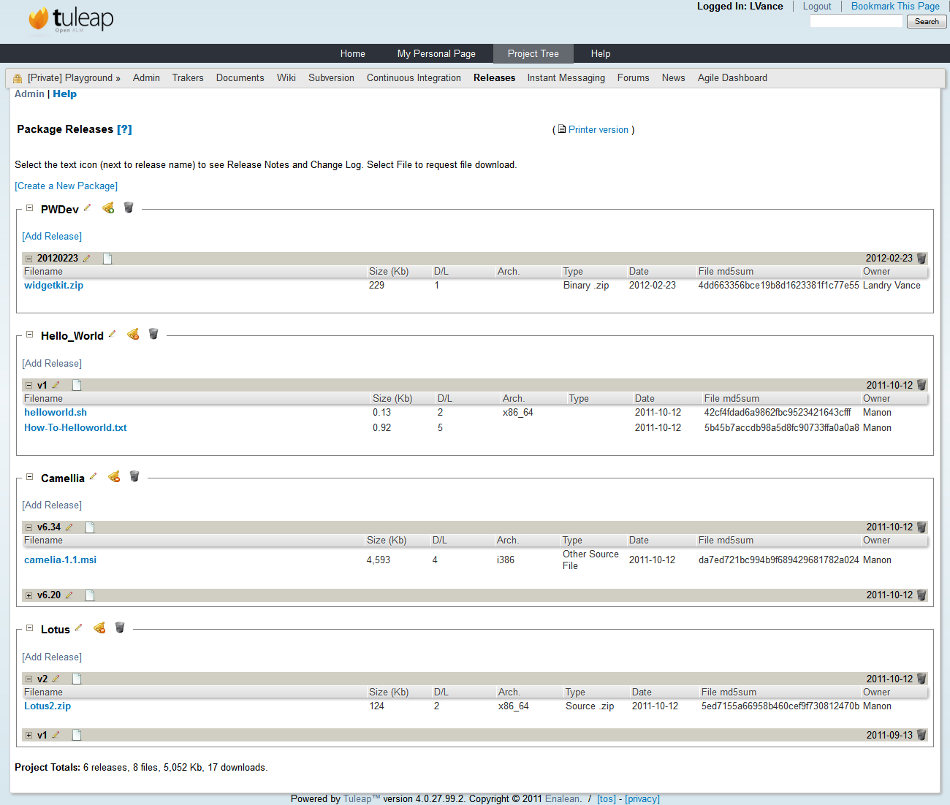
Example of a Delivery Manager screen
Browsing packages
As explained in the Delivery Manager Jargon, projects can contain several packages. In order to have a better visibility on the service, all packages are collapsed by default.
You can see the full content of a package by clicking on the “plus” icon located just before the package name.
Tuleap gives you the opportunity to monitor the packages. Like this, you will be notified when a new release is available, or if a release is updated, etc. In order to monitor a package, click the bell icon located after the package name. If you’re already monitoring the package, there is a red sign on the bell. If you don’t monitor the package, the bell has a green plus on it.
Browsing releases
A package can contain several releases. In the example, the package “Camellia” has 2 releases called v6.34 and v.620, listed in chronological order. Each release contains a certain number of files.
Like packages, the content of the releases can be hidden to enhance visibility. The mechanism is the same: click the plus and minus icons to expand/collapse the release content. By default, only the first release of each package (which is the latest one) is expanded.
After each release name, the icon representing a text file let you read the notes and the changelog of the current release.
Downloading files
Each release contains a certain number of files to be downloaded. In the case of the release 3.0.1, two ISO image archives can be downloaded. Files that belong to the other releases are hidden in this example. To make them visible, just click the small plus that stands just before the name of the release. Some file information is given, like the size, the type of file, the architecture (if it is relevant) the date and the number of downloads. To download a file, you just have to click the name of the file and follow the instructions.
Delivery manager Administration
This section is accessible by project admin or have write files permissions. It goes through a detailed explanation of the Delivery Manager process. This is a 2-step process:
Package Creation: Create one or several packages. This must only be done once. When packages are in place you can add a new release or update an existing one in them at any time.
Release Creation: Once a package has been created, you can add (and update) releases to it
When you are Files Administrator, you are able to perform the admin actions on the Delivery Manager home page.
Files Permissions
Files permission is based on Tuleap permissions model.
Global files permissions
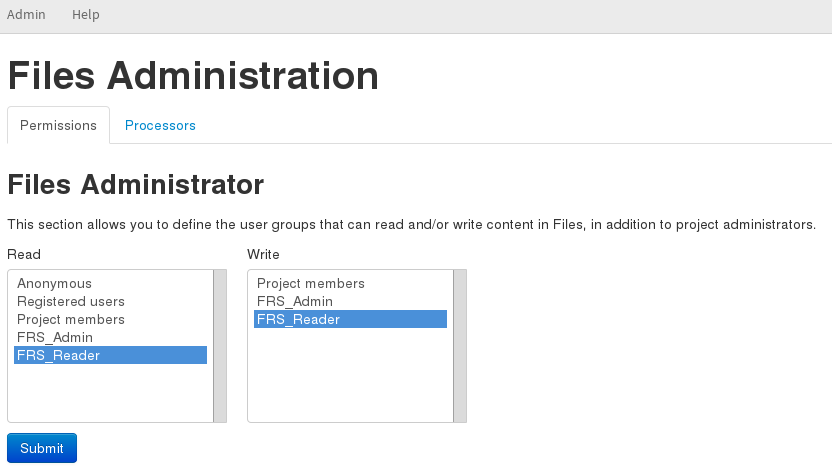
- There is two level of permissions :
- Write: defines the user groups who can administrates Files and create packages and releases Read: defines the user groups who can read packages and release content

The global permission screen for Files
Package Administration
To administrate packages, you must be project admin or have write files permissions. Package creation and modification are nearly the same.
Package Creation
To create a package, you just have to click the [add a package] link located on the top of the Delivery Manager screen. Then, fill the form, giving the package name, its relative rank on the Delivery Manager screen, and its status:
- Package Name: this is the name of the package. The name of the package must be unique in a project.
- Rank on screen: the rank indicates the position the packages will be displayed in the screen. You can choose the value: ‘at the beginning’, ‘at the end’, or after every other package.
- Status: an active package will be displayed, whereas a package with a hidden status won’t appear on the Delivery Manager screen. For project admins or file admins, the hidden packages are displayed in italic, in order to update them.
Package Modification
To update a package, just click the [edit] icon located after each package name. Then, the modification form is the same than the creation one, except that you can set read permissions on the package.
Files writers (see Global files permissions) can attach access permissions to any existing package.
If you do not specify any access permissions for a package, it inherits the global access permissions. By default, permissions attached to a package apply to all releases and files that belong to this package. But you may also set different permissions to specific releases (see below).
Release Administration
To administrate releases, you must be project admin or have write files permissions. Release creation and modification are the same.
Release Creation and modification
Once a package has been created you can immediately start adding releases to it. Click on the [Add a Release] link of the appropriate package.
The release creation and modification process is really easy to perform. It can be divided into 6 steps, but some are optional. In every case, you can update the release at any time
Step 1 - Give Release properties
The first step is the only one mandatory to create a release. It gives you a chance to modify the package of the release, the release date, and the status of the release. You also have to provide the release name.
Step 2 - Upload and attach files to the release (optional)
This step is optional in the way that you can add the files after having create the release, but of course, a release should contain at least one file to be relevant. As explained above multiple files can be attached to the same release. To attach a file, click the [add file] link. Then, a select box appear, in order to select the file to attach. There is two solution to attach a file:
- Direct Upload: you can upload the file via the Web interface by using the “Local file - Browse” option in the pull down menu and pointing to the appropriate file on your local disk.
- FTP / SCP: upload your file via ftp or scp and then select the appropriate file name from the “FTP/SCP Files list ” in the pull down menu.
Note
Tuleap server offers an upload mechanism via FTP (ou SCP). To upload your files, follow the instructions given when you click the ? next to the [add file] link. Then click the [Refresh File list] link to see your files.
Before you upload the files make sure you gave them names that will speak to Tuleap users. Ideally the file names should include the release label in it and any other extension telling whether it is a source file or a binary file.
Step 3 - Add Release Notes and/or Changelog (optional)
With the release, you can also provide notes or changelog, and even both! You can either cut and paste or upload Release Notes and ChangeLog. To upload a release note or a changelog, click the Upload link.
The Release Notes is typically a short (10 to 20 lines) and high-level document that summarizes the new features delivered in this release with a focus on the user visible changes (new UI, new functions, new APIs…). This is an important document and all new releases should definitely have one. Release Notes are immensely helpful to the community to determine whether they need to upgrade to the next release.
The ChangeLog is a much more technical document. It contains all bugs fixed in this new release as well as any change in the design or the architecture. This document is not as critical as the previous one to the normal end-user but it is absolutely pivotal for those who use your software in other development or integration activities.
Note
To build Tuleap changelog for issues, we use a custom artifact link nature “Fixed In”. Every time integrators merge a patch and add it to the public request on Tuleap.net, we add a link “Fixed In” on the release. All issues are in reverse link or release
example: reverse link of a Tuleap release link use to build changelog.
Step 4 - Set permissions to the Release (optional)
By default, if your project is public, releases have no specific access permissions: access to all files is granted to any Tuleap registered user (anonymous users are not allowed to download release files). However, in some cases, you might want to limit the users allowed to download your software. In these specific cases, you can restrict access permissions to your packages and releases to specific user groups. See User Groups for more information on user groups. To define or to change the permissions on a release, click the [view/change] link in the permissions frame.
Package and release permissions are enforced at two different levels:
- File List: When a user is not granted access to a package or release, then the package or release is not listed in the ‘File’ main page, so s/he does not know that the file exists.
- Download: If a user finds or forges a download link for an unauthorized file, the download will still fail. The system systematically re-checks for permissions when files are requested for download.
If you do not specify any access permissions for a release (or reset them to default), it inherits the access permissions from the package it belongs to. However, when you define a permission for a release, then it overrides the permissions defined for the package.
The permissions set for the release can be only stricter than the package permissions.
Step 5 - Submit a News (optional)
This step is optional in the sense that you can skip it if you want. This step gives the opportunity to project admin to submit a news about the release they’ve just created (if you’re not project admin or news admin, you won’t see this step). A default subject and message are pre-filled. You are of course free to modify it. The news will be displayed on your project dashboard. It is a good way to advertise the users that a new release have been done. The news will also appear in the news administration page, like others.
Step 6 - Send e-mail notification (optional)
This step is optional in the sense that it may not show up on your screen. If some Tuleap users monitor your package, this step will tell you how many of them are doing so. Tuleap gives you the freedom to send an e-mail notification or not to the users who expressed interest in your packages. Do not bypass this step, always inform your community of users and developers.
Note
When you prepare your files for release make sure that you include a README file in the top directory of each file that a user can download. And pack this README with useful information like the address of your Tuleap site, the Mailing list you have put in place for your project, how to submit a bug or a support to the project team (via Tuleap of course)
Processor List Administration
Project admins or user groups who have write files permissions can manage the processor list per project. The processor is an (optional) attribute of a released file. Depending the project or working domain, you could be interested in adding processors to the existing list. To do it, follow the admin link “Manage processors” of the Delivery Manager. Then, you have the list of the available processors. System processors are not editable. The other processors are specifics to the current project. You can edit them, delete them, as well as create new ones. A processor has a name and a rank in the processor list.